Monday, July 14, 2008

Tangent: Using Adventure Illustrations

There is a lot of excellent artwork in the Pathfinder adventures, and it would really be a shame if you, the DM, were the only one who got the chance to enjoy it. I've taken to printing out images from adventures for my players' benefit.

You know that DM screen you have with all that useful information on your side? There's probably some really fantastic epic battle taking place on the other side of the screen. Yeah, it's pretty, but ever feel like giving your players a change of scenery?

Here's what you do: print out illustrations from the adventure you are running. These can be of important NPCs, significant landmarks or even pitched battles. They will all help set the mood. Cut your image down so that it can fit comfortably against the back side of your DM screen without overlapping one of the edges of the screen. Then take a paperclip, and clip the cut-out illustration to the back side (the side facing the players) so that it hangs upright. Your players can now see all these illustrations for themselves in a convenient place! You can even write in labels for NPC names and the like. Don't forget to change pictures when the time comes.

It should look something like this:

Why thank you, that is a badass-looking screen, isn't it?

I used to post extracted images from the Adventure Path here for others to use, but given the number of groups making use of this conversion blog for their own games I am no longer comfortable doing so without Paizo's permission. I'd be happy to walk others through the steps to extract your own images, and if you're having trouble with the process and want the images to use as player handouts or props during your game just let me know and I can try to work something out for you.

Die, Dog, Die!

The third (and final) encounter of the Swallowtail Festival is designed as a climax and should really stretch the party's resources. They should be spending their freshly-earned action points and daily powers now. Describe the scene and center the encounter around the south-eastern building (this will be where Aldern is located). Don't bother placing Aldern on the map. Just have him hide nearby while the goblins ignore him in order to focus on the more threatening PCs.

Make a mental note prior to this fight if any of the party are suitable objects of affection for Aldern. If not, keep a running tally of the damage done by each PC during this fight. Use this to help determine who Aldern is most fascinated with.

I suggest the following encounter for a party of five adventurers:

  • 2 Goblin Skullcleavers
  • 2 Goblin Sharpshooters
  • 1 Goblin Blackblade
  • 1 Goblin Dog
Total: 750 xp (Level 3 Encounter)

Once the goblins have been mopped up, introduce the party to Aldern and select his favored PC. Handling Aldern and the next few challenges will be covered in subsequent posts.

Sunday, July 13, 2008

Goblin Pyros

Start the PCs wherever they finished the previous encounter. I suggest the following encounter for a party of five adventurers:

  • 5 Goblin Cutters
  • 2 Goblin Hexers
  • 2 Goblin Warriors
Total: 625 xp (Level 2 Encounter)

The hexers should immediately use their Vexing Cloud abilities in tandem to cover as much of the map as possible, keeping the clouds maintained as long as they can. Don't forget to use the Goblin Tactics abilities you have at your disposal, and try to keep a minion alongside each hexer so they can soak up ranged attacks.

Again, allow the PCs a short rest to recover after this fight. They will probably have used a lot of their encounter powers (and possibly some daily powers) in the last fight, and the next one is the hardest still. Don't forget to award the PCs a milestone for completing the Goblin Pyros encounter.

Initial Assault

After reading off the boxed text, set up your battle mat and draw out the first encounter's map.

Begin the PCs anywhere they'd like within the festival grounds. The goblins appear coming from the northeast street between the buildings. I suggest the following encounter for a party of five adventurers:

  • 4 Goblin Cutters
  • 2 Goblin Warriors
  • 2 Goblin Blackblades
Total: 500 xp (Level 1 Encounter)

Once the party has finished off the last of the goblins, provide them with the equivalent of a five-minute rest as the crowded streets begin to clear and the goblins start to converge on the town square. When they've healed up and gotten their bearings, begin the next encounter.

Saturday, July 12, 2008

Tangent: Updating the Rise of the Runelords Player's Guide

The Player's Guide for the Rise of the Runelords adventure path is relatively light on the mechanics. It has a handful of feats and some new equipment, which could stand to be converted. In addition, the new deities should be assigned Channeled Divinity feats.

Let's first deal with the deities. NChance has put together an excellent set of new Channeled Divinity feats for the Golarion deities. They are provided below with his permission:

Abadar's Decree [Divinity]
Prerequisites:
Channel Divinity Class feature, must worship Abadar
Benefit: You can invoke the power of your deity and use Abadar's Decree.


Arcana of Nethys [Divinity]
Prerequisites:
Channel Divinity Class feature, must worship Nethys
Benefit: You can invoke the power of your deity and use Arcana of Nethys.


Calistria's Sting [Divinity]
Prerequisites:
Channel Divinity Class feature, must worship Calistria
Benefit: You can invoke the power of your deity and use Calistria's Sting.


Cayden's Courage [Divinity]
Prerequisites:
Channel Divinity Class feature, must worship Cayden Cailean
Benefit: You can invoke the power of your deity and use Cayden's Courage.


Desna's Liberation [Divinity]
Prerequisites:
Channel Divinity Class feature, must worship Desna
Benefit: You can invoke the power of your deity and use Desna's Liberation.


Eye of Erastil [Divinity]
Prerequisites:
Channel Divinity Class feature, must worship Erastil
Benefit: You can invoke the power of your deity and use Eye of Erastil.


Gorum's Steel [Divinity]
Prerequisites:
Channel Divinity Class feature, must worship Gorum
Benefit: You can invoke the power of your deity and use Gorum's Steel.


Gozreh's Rain [Divinity]
Prerequisites:
Channel Divinity Class feature, must worship Gozreh
Benefit: You can invoke the power of your deity and use Gozreh's Rain.


Iomedae's Sword [Divinity]
Prerequisites:
Channel Divinity Class feature, must worship Iomedae
Benefit: You can invoke the power of your deity and use Iomedae's Sword.


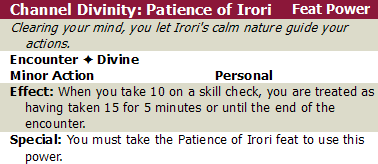
Patience of Irori [Divinity]
Prerequisites:
Channel Divinity Class feature, must worship Irori
Benefit: You can invoke the power of your deity and use Patience of Irori.


Pharasma's Caress [Divinity]
Prerequisites:
Channel Divinity Class feature, must worship Pharasma
Benefit: You can invoke the power of your deity and use Pharasma's Caress.


Sarenrae's Corona [Divinity]
Prerequisites:
Channel Divinity Class feature, must worship Sarenrae
Benefit: You can invoke the power of your deity and use Sarenrae's Corona.


Shelyn's Grace [Divinity]
Prerequisites:
Channel Divinity Class feature, must worship Shelyn
Benefit: You can invoke the power of your deity and use Shelyn's Grace.


Torag's Hammer [Divinity]
Prerequisites:
Channel Divinity Class feature, must worship Torag
Benefit: You can invoke the power of your deity and use Torag's Hammer.


Evil deities should be off-limits to players. I prefer to disallow evil characters in my games as a rule of thumb, unless the adventure is designed for an all-evil party. It's just asking for trouble and the bad sort of drama.

On to the other feats. Remove Big Game Hunter. It is strictly better than the Paragon-tier feat Light Blade Precision. Use the following replacements for the other feats in the Player's Guide (all of these are, of course, Heroic tier feats):

City Born
Prerequisite: 1st-level character, cannot have Country Born or Lone Wolf.
Benefit: Choose Magnimar, Korvosa, or Riddleport as your home city. The frantic bustle of the city has honed your reactions - you gain a +1 feat bonus to your Reflex defense. If you’re from Magnimar, you gain a +1 feat bonus on Diplomacy checks. If you’re from Korvosa, you gain a +1 feat bonus on Intimidate checks. And if you’re from Riddleport, you gain a +1 feat bonus on Bluff checks.

Country Born
Prerequisites: 1st-level character, cannot have City Born or Lone Wolf.
Benefit: A childhood of farm work, apprenticeship, or similar toil has granted you reserves of endurance. Once per day, when you would be weakened or slowed, you may make a saving throw against that effect (and any effects tied to it) as a free action. Your traditional upbringing has sharpened your willpower as well, granting a +1 feat bonus to your Will defense.

Lone Wolf
Prerequisites: 1st-level character, cannot have City Born or Country Born.
Benefit: You have a +2 feat bonus on saving throws to avoid dying when reduced to negative hit points. Your vigorous health also grants you a +1 feat bonus to your Will defense.

Totem Spirit
Prerequisites: Member of a Shoanti tribe.
Benefit: The benefit granted by this feat depends on which Shoanti tribe you belong to:
Lyrune-Quah (Moon Clan): You gain a +1 feat bonus to your Will defense and a +1 feat bonus on Perception checks.
Shadde-Quah (Axe Clan): Enemies that you mark take a penalty of -3 to attack rolls when attacking targets other than you (instead of a -2 penalty). You also gain a +1 feat bonus on Intimidate checks.
Shriikirri-Quah (Hawk Clan): You gain a +1 feat bonus on Initiative checks and a +1 feat bonus on Athletics checks.
Shundar-Quah (Spire Clan): You gain a +1 feat bonus to your Fortitude defense and a +1 feat bonus on Perception checks.
Sklar-Quah (Sun Clan): You gain a +1 feat bonus to your Reflex defense and a +1 feat bonus on Acrobatics checks.
Skoan-Quah (Skull Clan): You gain a +2 bonus on weapon damage against undead and a +1 feat bonus on Heal checks. The bonus damage increases to 4 at 11th level and increases to 6 at 21st level.
Tamiir-Quah (Wind Clan): You may move an additional 1 square when using the run or charge actions. You also gain a +1 feat bonus on Athletics checks.

Varisian Tattoo
Prerequisites: Con 13, wizard
Benefit: When you take this feat, choose a type of damage from the following list: fire, cold, thunder, lightning, psychic, necrotic, force. Your spells that deal this type of damage deal an additional 1 point of that damage when they hit. The bonus damage increases to 2 at 11th level and increases to 3 at 21st level. In addition, you may have five Prestidigitation effects active at the same time (instead of three).

As for equipment, we'll focus on weapons first, then armor and miscellany. There are seven weapons listed in the Player's Guide: the dogslicer, starknife, war razor, klar, earth breaker, ogre hook and bladed scarf. The klar is also a shield, and hide shirt is a new armor type.

The dogslicer and war razor are basically a re-flavored short sword and dagger, respectively. They can be treated as such. The starknife best functions as a heavy thrown light blade. The klar is both a light shield and light blade with the off-hand tag, which loses its AC and Reflex Defense bonus if used as a weapon (dealing 1d6 damage) until the end of the wielder's next turn. The earth breaker can use the heavy flail's mechanics, and the ogre hook is similar to a greataxe, though the chances of the players finding one in an appropriate size is small. The bladed scarf is a superior light blade weapon (requiring specific training to use) with reach which deals 1d6 damage. Why anyone would want to wield one beyond for flavor beats me.

If this is more than you want to deal with, just use the following simple conversions:

  • Dogslicer - short sword
  • Starknife - shuriken
  • War razor - dagger
  • Klar - remove entirely
  • Earth Breaker - heavy flail
  • Ogre Hook - greataxe
  • Bladed Scarf - spiked chain
The hide shirt really doesn't have a place in 4th Edition, just as there is no chainmail/chain shirt distinction anymore. Just treat it as hide armor.

Most of the miscellaneous equipment listed in the Player's Guide can be done without in 4th Edition, especially since the beneficiaries of the two most interesting (the barbarian chew and Varisian idol) haven't seen a 4th Edition incarnation yet. My advice is to simply not update this extra equipment.

That should do it! The Rise of the Runelords Player's Guide is now updated to 4th Edition.

Thursday, July 10, 2008

Burnt Offerings

Some quick notes up front: this is all intended solely for the conversion of the content of Paizo's products to 4th Edition. This is not intended - nor will it function - as a substitute for the adventure itself. The Pathfinder product line, the Rise of the Runelords adventure path and all properties contained within are copyright Paizo Publishing. All materials published on this website not covered by the above are copyright myself, but I grant permission to duplicate and distribute such materials freely so long as they are not used for monetary gain.

Over the course of this project I will add notes on how I run my games, and suggestions for how the adventure should be handled. I won't offer advice unless I feel it is sound, and you can feel free to incorporate as much of it as you wish.

Burnt Offerings is the first Rise of the Runelords adventure. It takes place in and around the coastal town of Sandpoint in Varisia. The first thing you should do, before the campaign even begins, is to allow your players to get acquainted with the setting. The Rise of the Runelords Player's Guide is an excellent place to start. Make it clear that the mechanical information contained within does not apply to your campaign (this includes the feats and equipment sections). I may over the next few days update some of this to 4th Edition, though your campaign will not suffer if you simply remove it entirely. I strongly encourage you to allow all core races (the word "core" in this blog is used in the same manner Wizards uses it - anything published by Wizards of the Coast for 4th Edition in an official capacity is "core"). Dragonborn and Tieflings can easily be incorporated as exotic travelers from distant lands. At any rate, the more familiar your characters are with the land and its people, the better. That goes for you too. Make sure you've read the Player's Guide and the Sandpoint chapter of Burnt Offerings.

Sit your players down and help them through character creation. Make sure you have plenty of blank character sheets on hand along with enough pencils to go around. Again, I strongly encourage you to allow all core player options. There is no reason to disallow something entirely, and precious little reason to alter mechanics. Nine times out of ten, DMs do not have the experience and mastery of game balance to handle the task of "fixing" parts of the game. I certainly don't.

As a note: my group of players tends to hover around five people per game, which is the "target" number of players for 4th Edition. If you have more or fewer players in your game, simply use the DMG's encounter building guidelines to adjust the challenges accordingly. It's not hard.

When you're ready to start the adventure, the first thing you should do is set your workspace up. As a DM, part of your job is to make sure that the game runs smoothly. This means that you want to avoid cluttering up your side of the table while still having plenty of helpful information at your fingertips. Here's my preferred setup:

  • The room: Should be large enough to hold the table and all your players with plenty of room to maneuver into and out of chairs. Should be mostly free of distractions.
  • The table: Nice and large. Square or round tables are preferable to long, rectangular ones. You want the table to fit your battle mat evenly so that everyone has roughly equal access.
  • Battle mat: Don't kid yourself, you need one. The good kind is large (around 20"x20" at least), can be rolled up (always roll it up so that the 1-inch squares are on the outside) and works with washable markers.
  • Markers: Crayola My First Washable Markers. Not kidding. Go to the market and buy a pack. Do NOT use dry erase or whiteboard markers of any kind on your battle mat. The colors will sink into the mat and you'll be staring at a shadow of your first encounter for the rest of your gaming days.
  • Spray bottle: Small is good. I went out and bought a spray bottle of whiteboard cleaning fluid and emptied the thing out, rinsed it a couple times and refilled it with water. Works like a charm. You might want to keep some paper towels on hand to wipe the mat down with, too.
  • Minis: I use Dungeons & Dragons Miniatures. You should too, since you need minis anyway and it helps support the guys who make D&D possible. It doesn't hurt that they're of decent quality and designed for a 1-inch grid.
  • Poker Chips: Keeping track of marks, curses, quarries and challenges can be a pain without some way to visualize them. Poker chips of various colors work well, though they tend to be a little large for a 1-inch grid.
  • DM's Screen: A brilliant invention - keeps important information in an easy-to-access place and keeps wandering player eyes from stealing adventure secrets from under your nose.
  • Paperclips: To hang interesting things from the front of the DM's Screen for your players to look at.
  • The adventure: Woah, hey, really? Even if you have this conversion guide on hand in some form, have the published adventure with you. I don't care how familiar you are with it. Keep it behind the screen.
  • Dice: A full set or two.
  • Pencils: Players forget.
  • Snacks: Have easy access to both food and drink. If your games go on for a few hours, order pizza or what have you.
  • Music: Stick to instrumental pieces (or at the very least, pieces with no intelligible lyrics). Lots of great stuff out there, so spend some time browsing.
  • Core books: If you're running a 4th Edition game, have the 4th Edition rules there for goodness' sake. Player's Handbook, Monster Manual and Dungeon Master's Guide at a minimum.
  • Laptop: Or other computer. Not everyone owns one, and not everyone has a desktop computer in a convenient place, so this is optional. It helps, though. A lot. You can play music through it, search your digital copies of books, use the D&D Insider Compendium, grab online materials (like this guide), take notes on the campaign, etc.
A substantial list, but your experience will be better for it, I promise.

Make a note of each character's name. Try to remember them. Try really hard. It helps the immersion factor to call on players by their characters' names. I'm terrible about this but I'm working on it. Also keep mental note of their race, class and gender. Constructing a mental image of the character helps a lot - think of them as people and suddenly you'll find yourself recalling details much easier.

To kick the adventure off, drop your players right into the middle of the Swallowtail festival. None of this wake-up-in-the-morning, what-do-you-do-now nonsense. The festival is busy. Some of the player characters probably are familiar with the town, so refer to the townspeople by name as well as occupation. Your job in the first few minutes is to make Sandpoint seem alive. Its people are (save a few of its more sober residents) excited, jovial, eager to show off. Describe the scene vividly, using the information given to you in the adventure. When your players have had a suitable taste of what Sandpoint and the festival are like, go ahead and begin the first encounter.

Rise of the Runelords

Welcome to Tales from the Rusty Dragon. This is a project blog whose purpose is to chronicle my conversions of Paizo Pathfinder adventure paths to the Dungeons & Dragons 4th Edition rules set. My goal is for this blog to serve as a resource to other DMs who would like to run these campaigns in the latest edition of D&D, and to that end will be focused primarily on how to run the adventures.

I see little point in a lengthy introduction, so let's get right into it. No better place to start than the beginning, which in this case is Burnt Offerings, the first adventure in the Rise of the Runelords adventure path.