Thursday, July 24, 2008

A17 (Glassworking Room)

And, finally, Tsuto. This should stretch the party's resources relatively thin, and Tsuto has a healthy number of goblins working at the furnace. Of all the encounter maps in the Glassworks, this is the only one that doesn't need to be enlarged (and shouldn't be, since it barely fits on most mats as is).

When the PCs first arrive, it's goblins and only goblins. Tsuto arrives during round 3. Don't bother having a goblin go run and grab him. It's entirely possible that the PCs enter from the far end of the room, blocking the way to Tsuto anyway. Just have him join the fight upstairs on his own. Roll initiative for him and insert him into the combat at the northeast doorway. I suggest the following encounter for a party of five adventurers:

Total: 875 xp (Level 4 Encounter)

The goblins should absolutely focus on killing PCs in this fight, especially once Tsuto shows up. If a PC drops unconscious at any point, the nearest two monsters should make a beeline for the body, pick it up (a minor action), carry it to the furnace doors (bearing in mind that a single goblin carrying a body is slowed due to the weight), open the doors (a minor action) and finally throw the helpless character into the furnace (a standard action). If they have an action to spare, they also slam the furnace door shut again (a minor action). Careless PCs will thus find that this fight could prove quite lethal.

Also note that by this point, the party should have accumulated a total of 5,275 XP if all the encounters outlined here are followed. This is enough to bump each character to 2nd level. So far we're on track for our stated goal of reaching 4th level before the end of the adventure.

Tsuto has treasure parcel 1 and treasure parcel 3 from level 2. Tsuto also has 180 gold pieces worth of bribe money on him (treasure parcel 6). Sequestered on Tsuto's father, encased in glass, is treasure parcel 3.

Stat blocks:

A12 - A14 (Office & Reception)

By this point, the glassworks should seem infested with goblins. This is a notable departure from the original adventure, but shouldn't really alter the mood or urgency of the situation. You'll also note that the size of the glassworks' rooms has been increased by about 50%. This is because encounters in 4th Edition try to incorporate terrain and movement much more prominently than D&D 3.5 did. Increasing the space available will hopefully decrease the number of times the party gets bogged down in a corridor or doorway and let players and monsters use their tactical abilities more often.

For this encounter, place one of the goblin blackblades in the hallway between areas A13 and A15. When the PCs open the door into said hallway, the goblin's first action should be to pound on the door to area A12, where his closest allies are (the rest of the monsters in this encounter). The goblins have brought a fire beetle along at Tsuto's request to help make a mess of things. I suggest the following encounter for a party of five adventurers:

  • 1 Goblin Skullcleaver
  • 3 Goblin Blackblades
  • 1 Fire Beetle
Total: 550 xp (Level 1 Encounter)

Hanging on one of the walls in the reception room, encased in glass, is treasure parcel 4 from level 2.

A6 - A9 (Dining Room)

As soon as the PCs enter the dining room area, spring the next encounter on them.

Position the goblin cutters around the main dining table. You can introduce them to the PCs as devouring whatever meal you wish. One of them might have taking a liking to the salt pork, while others might prefer the leg of one of the glassworks' unfortunate workers. The underboss and skullcleaver can be in any adjoining room (though probably not the washroom). They immediately rush out to investigate any sounds of battle. I suggest the following encounter for a party of five adventurers:

  • 1 Goblin Underboss
  • 5 Goblin Cutters
  • 1 Goblin Skullcleaver
Total: 625 xp (Level 2 Encounter)

The Goblin Underboss carries treasure parcel 4, and treasure parcel 2 is propped up against a table nearby.

Wednesday, July 23, 2008

A3 - A5 (Servants' Quarters)

The Glassworks was originally devoid of hostile life save the glassworking room. We need more encounters, so there are now goblins crawling everywhere.

Again, note that the doorway into the servants quarters now leads out into the hallway instead of the dining area in order to separate these two encounter areas from one another.

Array the goblins and their dogs within A5, and set the party up just outside the door in the hallway. The goblins are still in the process of gleefully ripping up bedsheets and clothing while the goblin dogs rest on the floor nearby. I suggest the following encounter for a party of five adventurers:

Total: 500 xp (Level 1 Encounter)

The goblin blackblade here is carrying a pack of some of the tribe's supplies and what they've managed to pull off the workers' bodies and belongings. Within are two potions of healing, 120 gold pieces and a pearl worth 100 gold pieces (treasure parcel 5 from level 1, plus treasure parcel 7 from level 2).

The Glassworks

The Glassworks has been increased from one encounter to four. This is probably a good time to point out that, for obvious reasons, the number of goblins mentioned as being used in the raid on Sandpoint needs to be increased. They cite 30 as the number, but the PCs kill nearly that many themselves during the attack. I suggest increasing the number to 50.

Once Shalelu has briefed the party on the goblin threat and Bethana has shown them Tsuto's letter to Ameiko, they should be well on their way to the Glassworks. This is a great point to introduce the party to quests. When Bethana implores them to find out what happened to Ameiko, give them a major quest reflecting their task (Discover Ameiko's Fate). There are no changes to the adventure until the PCs reach the interior. The DCs for climbing up the building, should the PCs choose to do so, and picking the locks on the exterior doors remain at 20.

I suggest guiding the PCs along a specific route through the Glassworks (mention that they hear giggling and banging from a certain door) so that the encounter with Tsuto in the glassworking room serves as the climactic finish to the set of fights. There is one notable change that should be made to the layout of the Glassworks. The door into area A5 (the servants' quarters) should be made to face northwest, across from the door to A4 (the storeroom) instead of leading into A6 (the dining room). 4th Edition is much happier with spacious combat areas, which this change accommodates.

As far as non-combat-related treasure goes, area A16 still holds 60 gold pieces in three rolls in a hidden portion of the desk (Perception DC 15 finds it). This is treasure parcel 9.

The first encounter the PCs will likely reach is in area A5 and its adjoining hallway.

Quest Card(s):

Tangent: Burnt Offerings Bestiary

Burnt Offerings, as with all Pathfinder adventures, contains a number of new monsters to challenge a party of adventurers. Regardless of whether or not the monster appears in the actual adventure, I will be updating all Bestiary entries to 4th Edition.

Burnt Offerings contains the Goblin Dog, Goblin Snake, Giant Gecko, Sinspawn, Attic Whisperer and the Sandpoint Devil. As monsters are used in the updated adventure they will be posted here, with the remaining entries published when the adventure concludes.

Goblin Dog:


Goblin Snake:


Giant Gecko:


Sinspawn Ripper:


Sinspawn Wrathlord:


Attic Whisperer:


The Sandpoint Devil:

Sunday, July 20, 2008

Monster in the Closet

This encounter will see some significant changes from its original incarnation, as well as the party's first introduction to an elite monster.

Back in D&D 3.5, a fight against a single monster of the party's level was considered to be an average fight. Of course, usually a single monster simply couldn't keep up with a full party of adventurers. It got to hit one of them, sure, and then the party got to hit back four times. Not the fairest of fights.

4th Edition fixes this by giving the average fight one monster per character. Furthermore, when the party does face off against a single monster, that monster is well-equipped to deal with taking on five enemies at the same time.

Unfortunately for this encounter as designed, goblins simply don't make great solo monsters. Elite, definitely, but they don't have the interesting powers that would allow a solo version to keep a party occupied. So forget the single monster in the closet approach. Gresgurt is still here, but he's simply the bravest of the goblins huddled together under the closet floor. There are now three monsters in the closet.

Begin the PCs in the upper story wherever they choose. It is likely that the encounter is begun when one of them physically checks on the body of Alergast, so place the closest PC one square away from the closet door (right next to the bed), having recoiled from Alergast's mutilated body. This will allow enough room for all three goblins to appear. Put Gresgurt in front. Use the Blackblades' Sneaky ability to help them deal with the cramped quarters of the bedrooms while Gresgurt hacks away at the nearest PC. I suggest the following encounter for a party of five adventurers:

  • 1 Elite Goblin Skullcleaver, Gresgurt (apply the Battle Champion template)
  • 2 Goblin Blackblades
Total: 500 xp (Level 1 Encounter)

Have Sheriff Hemlock dole out 190 gp and a potion of healing to the party when he comes to deal with the aftermath (treasure parcels 7 and 8).

Saturday, July 19, 2008

Tangent: Treasure and Leveling in Burnt Offerings

Characters in the original Rise of the Runelords adventure path were supposed to reach around 17th level by the campaign's conclusion. In 4th Edition we have a new challenge in restructuring the adventure path around a 30-level range rather than the 20 levels of D&D 3.5. I plan on setting this up so that by the end of the converted adventure path the party will have reached level 25 or 26. That means that each of the six adventures contained within Rise of the Runelords needs to advance the party by a little over four levels. To this end, we need to break down each adventure into roughly four sections so that experience and treasure can be awarded appropriately.

Burnt Offerings, as written, can be considered in three large sections: the festival and glassworks, the Catacombs of Wrath, and Thistletop. I am going to expand the number of encounters for each of these sections so that the PCs will hopefully be well on their way to fifth level by the end of the adventure.

Let's start by looking at experience breakdowns. By the end of Burnt Offerings, each character should have accumulated well over 4,000 xp. This means that a party of five characters should encounter in excess of 20,000 xp worth of monsters, traps, skill challenges and quests. This might seem daunting at first. Don't worry, we'll get there.

Part 1: Festival and Fire contains three encounters totaling 1,875 xp. Part 2: Local Heroes contains another 900 xp between three encounters. This puts the party a little over halfway to 2nd level by the time they begin Part 3. This means that, in short, the party needs to gain three and a half levels between the Glassworks, the Catacombs of Wrath and Thistletop. To that end, these dungeons are going to be jam-packed with encounters.

The Glassworks, including the quest to rescue Ameiko, is worth 3,175 xp. Much of the treasure for level 1 and some of the treasure for level 2 is located therein. The party should reach 2nd level partway through the Glassworks. The Catacombs of Wrath is worth 4,300 xp and contains the rest of level 2's treasure. Thistletop's exterior is worth 4,375 xp, including the quests to save Shadowmist and stop the goblin attack. The party should reach 3rd level well before they enter the fortress. Thistletop's upper floor is worth 2,250 xp and its second floor is worth 4,150 xp. The party should have reached 4th level by this point. Thistletop's lowest floor is worth 5,293 xp.

The more immediate concern should be the amount of treasure the party receives. All of the parcels available in Burnt Offerings and their locations are laid out below.

Treasure Parcels for Level 1:

  • Parcel 1 is carried by Tsuto.
  • Parcel 2 is found in the dining room.
  • Parcel 3 is on Lonjiku Kaijitsu's corpse.
  • Parcel 4 is carried by the Goblin Underboss in the dining room.
  • Parcel 5 is found in the backpack of a goblin blackblade in the servant's quarters.
  • Parcel 6 is the bribe money carried by Tsuto.
  • Parcel 7 is given to the party by Sheriff Hemlock.
  • Parcel 8 is given to the party by Sheriff Hemlock.
  • Parcel 9 is found hidden in a desk in the Glassworks.
  • Parcel 10 is given to the party by Aldern for rescuing him.

Treasure Parcels for Level 2:

  • Parcel 1 is found in the Cathedral of Wrath.
  • Parcel 2 is at the bottom of one of the prisoner pits.
  • Parcel 3 is carried by Tsuto.
  • Parcel 4 in encased in glass in the reception room.
  • Parcel 5 is carried by the statue in the welcoming chamber.
  • Parcel 6 is worn by Erylium.
  • Parcel 7 is found on a goblin in the servants' quarters.
  • Parcel 8 is worn by Erylium.
  • Parcel 9 is found in the meditation chamber.
  • Parcel 10 is found in the meditation chamber.

Treasure Parcels for Level 3:

  • Parcel 1 is carried by Warchief Ripnugget.
  • Parcel 2 is found with Bruthazmus.
  • Parcel 3 is found in Gogmurt's Lair.
  • Parcel 4 is in the treasury chest.
  • Parcel 5 is found with Bruthazmus.
  • Parcel 6 is either in the throne room or Ripnugget's room.
  • Parcel 7 is in the research room.
  • Parcel 8 is in the research room.
  • Parcel 9 is in the research room.
  • Parcel 10 is found scattered throughout Thistletop's upper level.

Treasure Parcels for Level 4:

  • Parcel 1 is in a hidden side room off of Malfeshnekor's prison.
  • Parcel 2 is found on a goblin corpse in the cave.
  • Parcel 3 is found in the research room.
  • Parcel 4 is allocated in The Skinsaw Murders.
  • Parcel 5 is found in the observation room.
  • Parcel 6 is a portion of the reward for returning Shadowmist.
  • Parcel 7 is found in the sarcophagi in the crypt.
  • Parcel 8 is found in the sarcophagi in the crypt.
  • Parcel 9 is Nualia's holy symbol.
  • Parcel 10 is a portion of the reward for returning Shadowmist.

Treasure Parcels for Level 5:

  • Parcel 1 is in Nualia's possession.
  • Parcel 2 is allocated in The Skinsaw Murders.
  • Parcel 3 is buried in the collapsed treasury.
  • Parcel 4 is allocated in The Skinsaw Murders.
  • Parcel 5 is part of the remaining wealth in the collapsed treasury.
  • Parcel 6 is allocated in The Skinsaw Murders.
  • Parcel 7 is part of the remaining wealth in the collapsed treasury.
  • Parcel 8 is allocated in The Skinsaw Murders.
  • Parcel 9 is allocated in The Skinsaw Murders.
  • Parcel 10 is the silver coffer found in the hidden room off of Malfeshnekor's prison.

Wednesday, July 16, 2008

The Boar Hunt

If the PCs decide to accompany Aldern on his hunting expedition into the Tickwood, run this skill challenge.

Skill Challenge: The Boar Hunt

Setup: The PCs are asked to accompany Aldern Foxglove on a boar hunt near Tickwood. The PC who holds Aldern’s attention from earlier receives a +2 bonus on all skills made during the hunt as Aldern actively assists him or her. At the beginning of the skill challenge, prompt any characters trained in the History skill to make checks in order to receive the information outlined under History below.

Complexity: 2 (6 successes before 3 failures)
Level: 1 (200 xp)
Primary Skills: Nature, Athletics, Perception, History

Nature (DC 5): You use your knowledge of boar habits to track one down and pursue it. Success here opens up the use of the Endurance skill.

Athletics (DC 10): You maneuver through the forest, climbing rocks or trees to get a better view of your surroundings as you search for signs of boar.

Perception (DC 10): You spot boar tracks out of the corner of your eye and follow them until you discover one of the creatures. Success here opens up the use of the Endurance skill.

History (DC 10): You recall that a traditional Varisian boar hunt is undertaken more for the thrill of the chase than anything else, especially amongst the nobility. A hunt ended quickly is a disappointment, even if you have fresh boar to show for it. A successful History skill check does not award a success.

Endurance (DC 15): The chase is on! You ride hard, tailing the boar and waiting for a shot to present itself. This skill is closed after one use, but can be re-opened. Success here counts as two successes but immediately ends the encounter. Failure on this check does not count against the PCs.

Success: The PCs impress and entertain Aldern with a thrilling hunt, and he allows each PC to keep the mount he purchased for them. If the encounter ends before a PC succeeds on an Endurance check, Aldern manages the killing shot.

Failure: The PCs did not manage to impress Aldern beyond the mild fascination he already possessed towards them. The hunt ends with nothing to show for it. Aldern accompanies the PCs back to Sandpoint, taking the horses with him once they reach the town.

Whether the party succeeds or fails, have Aldern grace them with 40 gp for saving his life during the Swallowtail festival (treasure parcel 10).

The Shopkeep's Daughter

One of the most important updates to the Pathfinder adventures in terms of conversion to 4th Edition is the addition of skill challenges where appropriate. In Part 2 of Burnt Offerings there are two such challenges: The Shopkeep's Daughter and The Boar Hunt.

Note that all skill challenges posted here use the skill check DCs from the July 16, 2008 update to the Dungeon Master's Guide.

Skill Challenge: The Shopkeep’s Daughter

Setup: One of the male PCs is tricked into accompanying Shayliss Vinder back to her father’s shop’s basement where she attempts to seduce him. The PC must avoid a violent confrontation with Shayliss’ father when he catches them in the basement. Allies may assist in skill checks made before they reach the basement.

Complexity: 2 (6 successes before 3 failures)
Level: 1 (200 xp)
Primary Skills: Bluff, Diplomacy, Insight

Bluff (DC 10): You can use this skill to convince either Shayliss or her father that the situation transpired in a different way than it actually did, or that you have something important to attend to for the good of the town.

Diplomacy (DC 10): You can use this skill to reason with Shayliss or her father, describing the situation in a way that looks favorable to you, or politely declining Shayliss’ request.

Insight (DC 5): You get the feeling that Shayliss is interested in something more than just rat extermination, and use that to attempt to weasel out of the situation before things turn ugly. This skill cannot be used after the PC reaches the basement.

Streetwise (DC 15): You recall hearing that Shayliss is even more of a troublemaker than her sister. Success here opens up the use of the Intimidate skill. This skill can only be used once this encounter.

Intimidate (DC 10): You threaten to spread word of Shayliss’ brazen actions to the town at large, causing Shayliss or her father to back off slightly.

Stealth (DC 10): You scamper out of sight, hoping to avoid a confrontation by not being noticed in the first place. This skill can only be used in the general store's basement before the PC has been spotted by Ven Vinder. The DC increases to 15 after two uses of this skill.

Success: The PC manages to remove himself from the seduction or confrontation with Ven Vinder. Succeeding with no failures means that there are no hard feelings created between the PC and Shayliss.

Failure: The PC is unable to avoid enraging Ven Vinder, who attempts to drive him from the shop. The PC and his “pervert friends” are thereafter barred from Ven’s shop.

Monday, July 14, 2008

Tangent: History and Rumors in Sandpoint

Here's an idea to give your players something interesting for spending time in Sandpoint. We're given a number of rumors and bits of information on the various goings-on around town, both in the Player's Guide and Burnt Offerings itself. If you collect your group's character sheets at the end of each session, hand them back at the beginning of the next one with a rumor or two (if you don't collect them, just pass out rumors at the beginning of your game day).

Before each game, roll a Streetwise skill check for each character. If that character beats a DC of 10, give that character a rumor. If that character beats a DC of 15, give that character two rumors. If that character beats a DC of 20, give them two rumors and indicate whether they are true or false. Characters can, of course, actively hunt down rumors by making a Streetwise skill check for each hour of listening to local gossip. Use the same DCs and results as above. The following is a list of rumors and other overheard bits of conversation compiled from Burnt Offerings for Sandpoint:

  • Sheriff Hemlock shares a long-running, “secret” romance with Lady Kaye, madam of the town brothel. TRUE
  • The ghost of the murderer Chopper haunts Chopper’s Isle, just north of town. FALSE
  • The White Deer Inn used to be the Black Deer Inn, but was tastefully renamed after the fire. TRUE
  • Ask Ven Vinder at the general store to see the “wine cellar” and he’ll sell you a jug of disgusting but potent orc rotgut. TRUE
  • Farmer Grump claims the Sandpoint Devil, a horselike monster with bat wings, once flew off with one of his prized sows. TRUE
  • Old Ilsoari at the museum sometimes wanders the beach at night, looking for treasures. TRUE
  • Don’t go down to the junktoss after dark: goblins steal the trash at night. TRUE
  • Solsta Vinder claims Sczarni stole her sheets last week and two cooling pies a week before that. FALSE
  • The new cathedral is magically protected from catching fire. FALSE
  • Murdermaw, a giant red snapper big enough to bite a boat in half, lurks in the Varisian Bay. FALSE
  • The Deverin family was once affiliated with the Chelish resistance, but was forced to flee to Varisia. FALSE
  • It’s bad luck to see the Sandpoint devil. Any who do are cursed to suffer an ill fate. It’s said the devil flies over Sandpoint in warning before tragedies, murders, and shipwrecks. FALSE
  • The Sandpoint devil is the son of a widowwoman named Agatha Leeds who used to live north of town and was said to practice dark magics and consort with evil beings. When she wandered into town round with child, she avoided all questions about her pregnancy. Weeks later, Leeds’s home was found reduced to cinders with its owner missing. Soon after, the first sightings of the Sandpoint devil began. FALSE
  • Evidence of the Sandpoint devil often disappears before it can be widely studied. Tracks, bitten animals, weapons with its blood, and similar such evidence regularly vanish, no matter how well watched or guarded. Many who have sought out the Sandpoint devil have disappeared without a trace either during their hunts or in the weeks following their return. FALSE
  • Descriptions, paintings, and other evidence regarding the Sandpoint devil often mysteriously catch on fire, sometimes burning entire homes to the ground. FALSE
  • Some Varisians say the Sandpoint devil has lived along the Lost Coast for thousands of years, protecting it from those who would exploit the land. Its modern misdeeds are merely its way of fending off the most recent encroachment of civilization. FALSE
  • The Sandpoint devil is sometimes seen in the company of other local legends and spooks, most commonly a white stag, the ghost of a young girl, and a zombie without feet. FALSE
"Can you hear him waking?
Up above the stairs?
Can you hear him weeping?
Is he really there?
Can you say ‘I’m speaking?’
Are you saying naught?
Is it you who’s weeping?
Is it you he’s caught?
When the nursery rhyming
Has whispered up above
Is it you who sounds
In the attic, my love?
When you hear your voice
Echoing on high
Is the voice a whisper
Is it just his lie?"
- Varisian nursery rhyme

  • Lonjiku Kaijitsu has a notoriously short temper, and many believe this is responsible for his estranged son and adventurer-turned-innkeeper daughter. TRUE
  • Mayor Kendra Deverin didn’t initially want the job, but after she was nominated for the role by her close friend Casp Avertin, she won the election by a landslide, something her primary opponent in the election, Titus Scarnetti, has never quite come to terms with. TRUE
  • Ethram Valdemar, patriarch of the Valdemar family, is not long for this life. The old man has a lung infection that keeps coming back, no matter how often the family pays to have it cured. TRUE
  • The Scarnettis have long lobbied to have prostitution oulawed in Sandpoint, and view the Pixie's Kitten brothel as a place where vice and criminal activity can take root. TRUE
  • The Fatman's Feedbag, contrary to popular belief, is owned by Jubrayl Vhiski. Jubrayl is also the rumored leader of the local gang of Sczarni, an extended network of Varisian thieves, highwaymen, con artists, graverobbers, smugglers and murderers. TRUE
  • Sir Jasper Korvaski was once a paladin of Abadar. He now runs the Sandpoint Mercantile League and his romantic relationship with Cyrdak Drokkus of the Sandpoint Theater is one of the town's worst-kept secrets. TRUE
  • It's whispered that the Two Knight Brewery's mead, ale and rum haven't quite tasted as good since Wade Deverin, one of its two owners, fell victim to a heinous murder. His brother, Gaven, now runs the Brewery, but Wade's death deeply shook his faith. TRUE
  • No one hates goblins more than Daviren Hosk. The bitter ranger's pride and joy is a large glass bottle filled with brine in which he's preserved the body of Chief Whartus of the now extinct (due in large part to Daviren) Bonegrinder Tribe. TRUE
  • Ameiko Kaijitsu at the Rusty Dragon has a "discount rooms for anyone who tells an exciting adventure story" policy. TRUE
  • Mysterious fires have claimed the Soggy River Mill, the Biston Pond Mill, and most recently the Cougar Creek Mill, leaving the Scarnetti Mill the only functioning grain mill in the region. TRUE
  • Rynshinn Povalli has operated Vernah's Fine Clothing for the last five years, since her mother's death. She is the daughter of a mysterious elven bard who reportedly was killed by goblins less than a week after Rynshinn's birth. Despite this, every year on the anniversary of her birth, a small package of elven trinkets has mysteriously appeared somewhere in the upper floors of Vernah's. TRUE
  • Ilsoari Gandethus keeps a goblin farm in the basement of the Turandarok Academy. FALSE
  • Ilsoari Gandethus keeps a nest of phantom spiders in the basement of the Turandarok Academy. FALSE
  • Ilsoari Gandethus keeps the Sandpoint Devil in the basement of the Turandarok Academy. FALSE
  • Not many people can afford to shop for books at the Curious Goblin with any frequency, but a nest egg gathered in his adventurous youth combined with a frugal lifestyle makes the success of Chask Haladan's business secondary to his own satisfaction. TRUE
  • Nisk Tander fancies himself a more gifted alchemist than he really is. Use caution when buying anything from Bottled Solutions. TRUE
  • It's whispered that Aliver "Pillbug" Podiker of the Pillbug's Pantry is secretly a poison merchant working for the Sczarni. TRUE
“Here comes crazy-man Das Korvut,
Mad as a cut snake in a wagon rut.
See how his chops go bouncity-bounce?
How many people has he trounced?
One! Two! Three! Four...”
- Children's hopsquares rhyme

  • The old sage Brodert Quink has a theory that the Old Light was once a war machine capable of spewing fire to a range of more than a mile, but he's a quack anyway. TRUE
The true or false nature of many of the above rumors are educated guesses and suggestions. If there is something you want to change, go right ahead. If, for instance, you want to turn Chopper's ghost into a plot thread you should probably change that particular rumor to TRUE.

Don't neglect players trained in the History skill either. A character who succeeds on a DC 15 History skill check knows all of the recent troubles Sandpoint has gone through (everything covered under The Late Unpleasantness) and some of the more recent portions of Sandpoint's History. If the character beats a DC of 20, they also know a few things about the ancient history of the area.

Tangent: Using Adventure Illustrations

There is a lot of excellent artwork in the Pathfinder adventures, and it would really be a shame if you, the DM, were the only one who got the chance to enjoy it. I've taken to printing out images from adventures for my players' benefit.

You know that DM screen you have with all that useful information on your side? There's probably some really fantastic epic battle taking place on the other side of the screen. Yeah, it's pretty, but ever feel like giving your players a change of scenery?

Here's what you do: print out illustrations from the adventure you are running. These can be of important NPCs, significant landmarks or even pitched battles. They will all help set the mood. Cut your image down so that it can fit comfortably against the back side of your DM screen without overlapping one of the edges of the screen. Then take a paperclip, and clip the cut-out illustration to the back side (the side facing the players) so that it hangs upright. Your players can now see all these illustrations for themselves in a convenient place! You can even write in labels for NPC names and the like. Don't forget to change pictures when the time comes.

It should look something like this:

Why thank you, that is a badass-looking screen, isn't it?

I used to post extracted images from the Adventure Path here for others to use, but given the number of groups making use of this conversion blog for their own games I am no longer comfortable doing so without Paizo's permission. I'd be happy to walk others through the steps to extract your own images, and if you're having trouble with the process and want the images to use as player handouts or props during your game just let me know and I can try to work something out for you.

Die, Dog, Die!

The third (and final) encounter of the Swallowtail Festival is designed as a climax and should really stretch the party's resources. They should be spending their freshly-earned action points and daily powers now. Describe the scene and center the encounter around the south-eastern building (this will be where Aldern is located). Don't bother placing Aldern on the map. Just have him hide nearby while the goblins ignore him in order to focus on the more threatening PCs.

Make a mental note prior to this fight if any of the party are suitable objects of affection for Aldern. If not, keep a running tally of the damage done by each PC during this fight. Use this to help determine who Aldern is most fascinated with.

I suggest the following encounter for a party of five adventurers:

  • 2 Goblin Skullcleavers
  • 2 Goblin Sharpshooters
  • 1 Goblin Blackblade
  • 1 Goblin Dog
Total: 750 xp (Level 3 Encounter)

Once the goblins have been mopped up, introduce the party to Aldern and select his favored PC. Handling Aldern and the next few challenges will be covered in subsequent posts.

Sunday, July 13, 2008

Goblin Pyros

Start the PCs wherever they finished the previous encounter. I suggest the following encounter for a party of five adventurers:

  • 5 Goblin Cutters
  • 2 Goblin Hexers
  • 2 Goblin Warriors
Total: 625 xp (Level 2 Encounter)

The hexers should immediately use their Vexing Cloud abilities in tandem to cover as much of the map as possible, keeping the clouds maintained as long as they can. Don't forget to use the Goblin Tactics abilities you have at your disposal, and try to keep a minion alongside each hexer so they can soak up ranged attacks.

Again, allow the PCs a short rest to recover after this fight. They will probably have used a lot of their encounter powers (and possibly some daily powers) in the last fight, and the next one is the hardest still. Don't forget to award the PCs a milestone for completing the Goblin Pyros encounter.

Initial Assault

After reading off the boxed text, set up your battle mat and draw out the first encounter's map.

Begin the PCs anywhere they'd like within the festival grounds. The goblins appear coming from the northeast street between the buildings. I suggest the following encounter for a party of five adventurers:

  • 4 Goblin Cutters
  • 2 Goblin Warriors
  • 2 Goblin Blackblades
Total: 500 xp (Level 1 Encounter)

Once the party has finished off the last of the goblins, provide them with the equivalent of a five-minute rest as the crowded streets begin to clear and the goblins start to converge on the town square. When they've healed up and gotten their bearings, begin the next encounter.

Saturday, July 12, 2008

Tangent: Updating the Rise of the Runelords Player's Guide

The Player's Guide for the Rise of the Runelords adventure path is relatively light on the mechanics. It has a handful of feats and some new equipment, which could stand to be converted. In addition, the new deities should be assigned Channeled Divinity feats.

Let's first deal with the deities. NChance has put together an excellent set of new Channeled Divinity feats for the Golarion deities. They are provided below with his permission:

Abadar's Decree [Divinity]
Prerequisites:
Channel Divinity Class feature, must worship Abadar
Benefit: You can invoke the power of your deity and use Abadar's Decree.


Arcana of Nethys [Divinity]
Prerequisites:
Channel Divinity Class feature, must worship Nethys
Benefit: You can invoke the power of your deity and use Arcana of Nethys.


Calistria's Sting [Divinity]
Prerequisites:
Channel Divinity Class feature, must worship Calistria
Benefit: You can invoke the power of your deity and use Calistria's Sting.


Cayden's Courage [Divinity]
Prerequisites:
Channel Divinity Class feature, must worship Cayden Cailean
Benefit: You can invoke the power of your deity and use Cayden's Courage.


Desna's Liberation [Divinity]
Prerequisites:
Channel Divinity Class feature, must worship Desna
Benefit: You can invoke the power of your deity and use Desna's Liberation.


Eye of Erastil [Divinity]
Prerequisites:
Channel Divinity Class feature, must worship Erastil
Benefit: You can invoke the power of your deity and use Eye of Erastil.


Gorum's Steel [Divinity]
Prerequisites:
Channel Divinity Class feature, must worship Gorum
Benefit: You can invoke the power of your deity and use Gorum's Steel.


Gozreh's Rain [Divinity]
Prerequisites:
Channel Divinity Class feature, must worship Gozreh
Benefit: You can invoke the power of your deity and use Gozreh's Rain.


Iomedae's Sword [Divinity]
Prerequisites:
Channel Divinity Class feature, must worship Iomedae
Benefit: You can invoke the power of your deity and use Iomedae's Sword.


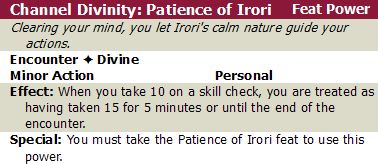
Patience of Irori [Divinity]
Prerequisites:
Channel Divinity Class feature, must worship Irori
Benefit: You can invoke the power of your deity and use Patience of Irori.


Pharasma's Caress [Divinity]
Prerequisites:
Channel Divinity Class feature, must worship Pharasma
Benefit: You can invoke the power of your deity and use Pharasma's Caress.


Sarenrae's Corona [Divinity]
Prerequisites:
Channel Divinity Class feature, must worship Sarenrae
Benefit: You can invoke the power of your deity and use Sarenrae's Corona.


Shelyn's Grace [Divinity]
Prerequisites:
Channel Divinity Class feature, must worship Shelyn
Benefit: You can invoke the power of your deity and use Shelyn's Grace.


Torag's Hammer [Divinity]
Prerequisites:
Channel Divinity Class feature, must worship Torag
Benefit: You can invoke the power of your deity and use Torag's Hammer.


Evil deities should be off-limits to players. I prefer to disallow evil characters in my games as a rule of thumb, unless the adventure is designed for an all-evil party. It's just asking for trouble and the bad sort of drama.

On to the other feats. Remove Big Game Hunter. It is strictly better than the Paragon-tier feat Light Blade Precision. Use the following replacements for the other feats in the Player's Guide (all of these are, of course, Heroic tier feats):

City Born
Prerequisite: 1st-level character, cannot have Country Born or Lone Wolf.
Benefit: Choose Magnimar, Korvosa, or Riddleport as your home city. The frantic bustle of the city has honed your reactions - you gain a +1 feat bonus to your Reflex defense. If you’re from Magnimar, you gain a +1 feat bonus on Diplomacy checks. If you’re from Korvosa, you gain a +1 feat bonus on Intimidate checks. And if you’re from Riddleport, you gain a +1 feat bonus on Bluff checks.

Country Born
Prerequisites: 1st-level character, cannot have City Born or Lone Wolf.
Benefit: A childhood of farm work, apprenticeship, or similar toil has granted you reserves of endurance. Once per day, when you would be weakened or slowed, you may make a saving throw against that effect (and any effects tied to it) as a free action. Your traditional upbringing has sharpened your willpower as well, granting a +1 feat bonus to your Will defense.

Lone Wolf
Prerequisites: 1st-level character, cannot have City Born or Country Born.
Benefit: You have a +2 feat bonus on saving throws to avoid dying when reduced to negative hit points. Your vigorous health also grants you a +1 feat bonus to your Will defense.

Totem Spirit
Prerequisites: Member of a Shoanti tribe.
Benefit: The benefit granted by this feat depends on which Shoanti tribe you belong to:
Lyrune-Quah (Moon Clan): You gain a +1 feat bonus to your Will defense and a +1 feat bonus on Perception checks.
Shadde-Quah (Axe Clan): Enemies that you mark take a penalty of -3 to attack rolls when attacking targets other than you (instead of a -2 penalty). You also gain a +1 feat bonus on Intimidate checks.
Shriikirri-Quah (Hawk Clan): You gain a +1 feat bonus on Initiative checks and a +1 feat bonus on Athletics checks.
Shundar-Quah (Spire Clan): You gain a +1 feat bonus to your Fortitude defense and a +1 feat bonus on Perception checks.
Sklar-Quah (Sun Clan): You gain a +1 feat bonus to your Reflex defense and a +1 feat bonus on Acrobatics checks.
Skoan-Quah (Skull Clan): You gain a +2 bonus on weapon damage against undead and a +1 feat bonus on Heal checks. The bonus damage increases to 4 at 11th level and increases to 6 at 21st level.
Tamiir-Quah (Wind Clan): You may move an additional 1 square when using the run or charge actions. You also gain a +1 feat bonus on Athletics checks.

Varisian Tattoo
Prerequisites: Con 13, wizard
Benefit: When you take this feat, choose a type of damage from the following list: fire, cold, thunder, lightning, psychic, necrotic, force. Your spells that deal this type of damage deal an additional 1 point of that damage when they hit. The bonus damage increases to 2 at 11th level and increases to 3 at 21st level. In addition, you may have five Prestidigitation effects active at the same time (instead of three).

As for equipment, we'll focus on weapons first, then armor and miscellany. There are seven weapons listed in the Player's Guide: the dogslicer, starknife, war razor, klar, earth breaker, ogre hook and bladed scarf. The klar is also a shield, and hide shirt is a new armor type.

The dogslicer and war razor are basically a re-flavored short sword and dagger, respectively. They can be treated as such. The starknife best functions as a heavy thrown light blade. The klar is both a light shield and light blade with the off-hand tag, which loses its AC and Reflex Defense bonus if used as a weapon (dealing 1d6 damage) until the end of the wielder's next turn. The earth breaker can use the heavy flail's mechanics, and the ogre hook is similar to a greataxe, though the chances of the players finding one in an appropriate size is small. The bladed scarf is a superior light blade weapon (requiring specific training to use) with reach which deals 1d6 damage. Why anyone would want to wield one beyond for flavor beats me.

If this is more than you want to deal with, just use the following simple conversions:

  • Dogslicer - short sword
  • Starknife - shuriken
  • War razor - dagger
  • Klar - remove entirely
  • Earth Breaker - heavy flail
  • Ogre Hook - greataxe
  • Bladed Scarf - spiked chain
The hide shirt really doesn't have a place in 4th Edition, just as there is no chainmail/chain shirt distinction anymore. Just treat it as hide armor.

Most of the miscellaneous equipment listed in the Player's Guide can be done without in 4th Edition, especially since the beneficiaries of the two most interesting (the barbarian chew and Varisian idol) haven't seen a 4th Edition incarnation yet. My advice is to simply not update this extra equipment.

That should do it! The Rise of the Runelords Player's Guide is now updated to 4th Edition.

Thursday, July 10, 2008

Burnt Offerings

Some quick notes up front: this is all intended solely for the conversion of the content of Paizo's products to 4th Edition. This is not intended - nor will it function - as a substitute for the adventure itself. The Pathfinder product line, the Rise of the Runelords adventure path and all properties contained within are copyright Paizo Publishing. All materials published on this website not covered by the above are copyright myself, but I grant permission to duplicate and distribute such materials freely so long as they are not used for monetary gain.

Over the course of this project I will add notes on how I run my games, and suggestions for how the adventure should be handled. I won't offer advice unless I feel it is sound, and you can feel free to incorporate as much of it as you wish.

Burnt Offerings is the first Rise of the Runelords adventure. It takes place in and around the coastal town of Sandpoint in Varisia. The first thing you should do, before the campaign even begins, is to allow your players to get acquainted with the setting. The Rise of the Runelords Player's Guide is an excellent place to start. Make it clear that the mechanical information contained within does not apply to your campaign (this includes the feats and equipment sections). I may over the next few days update some of this to 4th Edition, though your campaign will not suffer if you simply remove it entirely. I strongly encourage you to allow all core races (the word "core" in this blog is used in the same manner Wizards uses it - anything published by Wizards of the Coast for 4th Edition in an official capacity is "core"). Dragonborn and Tieflings can easily be incorporated as exotic travelers from distant lands. At any rate, the more familiar your characters are with the land and its people, the better. That goes for you too. Make sure you've read the Player's Guide and the Sandpoint chapter of Burnt Offerings.

Sit your players down and help them through character creation. Make sure you have plenty of blank character sheets on hand along with enough pencils to go around. Again, I strongly encourage you to allow all core player options. There is no reason to disallow something entirely, and precious little reason to alter mechanics. Nine times out of ten, DMs do not have the experience and mastery of game balance to handle the task of "fixing" parts of the game. I certainly don't.

As a note: my group of players tends to hover around five people per game, which is the "target" number of players for 4th Edition. If you have more or fewer players in your game, simply use the DMG's encounter building guidelines to adjust the challenges accordingly. It's not hard.

When you're ready to start the adventure, the first thing you should do is set your workspace up. As a DM, part of your job is to make sure that the game runs smoothly. This means that you want to avoid cluttering up your side of the table while still having plenty of helpful information at your fingertips. Here's my preferred setup:

  • The room: Should be large enough to hold the table and all your players with plenty of room to maneuver into and out of chairs. Should be mostly free of distractions.
  • The table: Nice and large. Square or round tables are preferable to long, rectangular ones. You want the table to fit your battle mat evenly so that everyone has roughly equal access.
  • Battle mat: Don't kid yourself, you need one. The good kind is large (around 20"x20" at least), can be rolled up (always roll it up so that the 1-inch squares are on the outside) and works with washable markers.
  • Markers: Crayola My First Washable Markers. Not kidding. Go to the market and buy a pack. Do NOT use dry erase or whiteboard markers of any kind on your battle mat. The colors will sink into the mat and you'll be staring at a shadow of your first encounter for the rest of your gaming days.
  • Spray bottle: Small is good. I went out and bought a spray bottle of whiteboard cleaning fluid and emptied the thing out, rinsed it a couple times and refilled it with water. Works like a charm. You might want to keep some paper towels on hand to wipe the mat down with, too.
  • Minis: I use Dungeons & Dragons Miniatures. You should too, since you need minis anyway and it helps support the guys who make D&D possible. It doesn't hurt that they're of decent quality and designed for a 1-inch grid.
  • Poker Chips: Keeping track of marks, curses, quarries and challenges can be a pain without some way to visualize them. Poker chips of various colors work well, though they tend to be a little large for a 1-inch grid.
  • DM's Screen: A brilliant invention - keeps important information in an easy-to-access place and keeps wandering player eyes from stealing adventure secrets from under your nose.
  • Paperclips: To hang interesting things from the front of the DM's Screen for your players to look at.
  • The adventure: Woah, hey, really? Even if you have this conversion guide on hand in some form, have the published adventure with you. I don't care how familiar you are with it. Keep it behind the screen.
  • Dice: A full set or two.
  • Pencils: Players forget.
  • Snacks: Have easy access to both food and drink. If your games go on for a few hours, order pizza or what have you.
  • Music: Stick to instrumental pieces (or at the very least, pieces with no intelligible lyrics). Lots of great stuff out there, so spend some time browsing.
  • Core books: If you're running a 4th Edition game, have the 4th Edition rules there for goodness' sake. Player's Handbook, Monster Manual and Dungeon Master's Guide at a minimum.
  • Laptop: Or other computer. Not everyone owns one, and not everyone has a desktop computer in a convenient place, so this is optional. It helps, though. A lot. You can play music through it, search your digital copies of books, use the D&D Insider Compendium, grab online materials (like this guide), take notes on the campaign, etc.
A substantial list, but your experience will be better for it, I promise.

Make a note of each character's name. Try to remember them. Try really hard. It helps the immersion factor to call on players by their characters' names. I'm terrible about this but I'm working on it. Also keep mental note of their race, class and gender. Constructing a mental image of the character helps a lot - think of them as people and suddenly you'll find yourself recalling details much easier.

To kick the adventure off, drop your players right into the middle of the Swallowtail festival. None of this wake-up-in-the-morning, what-do-you-do-now nonsense. The festival is busy. Some of the player characters probably are familiar with the town, so refer to the townspeople by name as well as occupation. Your job in the first few minutes is to make Sandpoint seem alive. Its people are (save a few of its more sober residents) excited, jovial, eager to show off. Describe the scene vividly, using the information given to you in the adventure. When your players have had a suitable taste of what Sandpoint and the festival are like, go ahead and begin the first encounter.

Rise of the Runelords

Welcome to Tales from the Rusty Dragon. This is a project blog whose purpose is to chronicle my conversions of Paizo Pathfinder adventure paths to the Dungeons & Dragons 4th Edition rules set. My goal is for this blog to serve as a resource to other DMs who would like to run these campaigns in the latest edition of D&D, and to that end will be focused primarily on how to run the adventures.

I see little point in a lengthy introduction, so let's get right into it. No better place to start than the beginning, which in this case is Burnt Offerings, the first adventure in the Rise of the Runelords adventure path.