Tuesday, April 28, 2009

B37 (Lizard Warrens)

The twelve shocker lizards located here will tear a party of adventurers to pieces if given reason. While they won't bother the group if they simply pass through, a hint of aggressive action can bring the entire warren breathing lightning down their necks.

It is assumed that the party will successfully navigate their way past the lizards without a combat encounter erupting. If, for some reason, combat does occur, feel free to run it as presented below, though the PCs' chances of success are slim. A single bluespawn counterbolt chain can send some characters into the negatives. Award them the full experience value if they succeed. If they simply avoid the lizards entirely, do not give them any experience. They may have the opportunity to deal with the lizards at a later time, however.

I suggest the following encounter for a party of five (overly aggressive) adventurers:

Total: 5,000 xp (Level 14 Encounter)

Monday, April 27, 2009

B36 (Lucrecia's Retreat)

Lucrecia has a surprise in store for the party here. Through whatever means (perhaps throwing her weight around in front of Dorella, or utilizing her own innate powers), she has managed to shackle a shadow slime with an arcane ritual. It waits in the dark corners of the prison cells. I suggest the following encounter for a party of five adventurers:

Total: 3,000 xp (Level 11 Encounter)

When the party arrives, assuming negotiations fail, Lucrecia makes haste to open the door to the cell block, and releases the slime from its imprisonment with an arcane gesture. It eagerly slips into Lucrecia's chamber and douses the burning brazier, plunging the room into darkness (unless the party is carrying its own light source, in which case it puts that out, too). This is just fine with Lucrecia, whose darkvision grants her a pretty significant tactical advantage. The shadow slime puts out light sources as quickly as it can manage, going so far as to ready an action to extinguish a light if it becomes a recurring problem (though if that doesn't work it gives up and just focuses on staying alive).

Stat block:

Sunday, April 19, 2009

B29 - B33 (The Kreeg Leadership)

This is one of the few times in my conversions where I will actually remove a monster from the original adventure's write-up. Encounters in 4th Edition play out much better when they involve a wide tactical area. In an indoor environment, this means creating encounters that span more than one room. This allows you to involve corners, doors, and other interesting features of the map that the players and monsters can take advantage of. To that end, the entire second story of the keep is now a single encounter, and in order to make it within the realm of the party's ability to handle, one ogre needs to be removed. I suggest the following encounter for a party of five adventurers:

  • Jaagrath Kreeg
  • Gragavan Kreeg (Ogre Warhulk)
  • Dorella Kreeg (Oni Mage)
  • Ogre Savage
Total: 4,550 xp (Level 14 Encounter)

Even with only four monsters participating, this may still turn out to be one of the most harrowing encounters the party sees in its adventuring career. It nears the upper bounds of what a fully-charged group of 5 PCs should be able to handle, except that this encounter takes place after the party has slain its way through a fortress full of ogres. Don't be concerned if the encounter takes longer than average - it's worth more than double an encounter of the party's expected level, so it ought to feel like an uphill struggle.

To that end, here are a couple ways of keeping this encounter frightening and heroic without overwhelming your party:

  • Make frequent use of Dorella's invisibility. She won't always have access to her powerful recharge-based abilities. Turning invisible uses up her standard action, and because she won't be making stealth checks the party will still have an idea of where she is standing if they want to try and contend with the -5 penalty to attack rolls.
  • When Jaagrath appears, have him demand that he be allowed to fight the PCs alone for two or three rounds. After this point, he laughs uproariously and invites the rest of the ogres to join in. Don't make his decision to involve the other ogres look cowardly. It should seem like he's had his fun, but has quickly tired of the sport and now just wants to crush the tiny PCs.
  • When Jaagrath is brought down, lower the DC for intimidating bloodied foes into surrender/fleeing by 10 (in other words, an Intimidate check opposed by the target's Will defense).
This latter rule can also be applied to any other ogres the PCs come across following Jaagrath's death, as long as they have proof of his passing (see the original adventure for more information).

You should be diligantly increasing the maneuvering space in tactical encounters, and it's especially important here (and, indeed, throughout the keep). Hallways in the keep as presented in the original adventure are 10 feet wide, which is exactly large enough for a single ogre to get in the way, turning the fight into a static swinging match. Corridors which are 20 feet in width are much better, allowing two ogres to stand and fight side-by-side. Note that this change very clearly favors the monsters. The party won't mind the 10-foot corridors so much, since they can put two melee characters abreast at the front, and are likely packing more ranged characters than there are ogres with strong ranged abilities.

Found amongst Jaagrath and Dorella (and the hidden compartment) are treasure parcels 1, 2 and 3 from level 9. At your option, you can include the Boots of the Mire (found below) here in the place of parcel 3. While normally I reserve converting magic items for those with particular plot significance, the boots are in line with the anticipated power level of the party and may see use in the near future. The map room contains treasure parcel 8 from level 9: the Lurkwood map worth 900 gold pieces, the Viperwall map worth 400 gold pieces, and the smuggler's map worth 100 gold pieces. If you don't want to make the party wait until they return to Magnimar to offload these maps, a well-connected trader passing through Turtleback Ferry might be willing to pick them up for the same price.

Stat blocks:

B21 - B27 (Infirmary and Barracks)

Much like the previous encounter, this one is triggered when either area B23 or B24 is explored. Silas waits within the infirmary, and the bickering ogres in area B24 pause their squabble for long enough to investigate sounds of battle. If the PCs stumble upon area B24 first (and manage to get themselves into a fight here), it takes two full rounds before Silas decides that protecting the keep might be more important than his artwork. I suggest the following encounter for a party of five adventurers:

  • Silas Kreeg (Ogre Warhulk)
  • 4 Ogre Savages
Total: 2,600 xp (Level 10 Encounter)

None of the other rooms on the first floor of the keep contain anything of interest.

B18 - B20 (Workroom and Armory)

This encounter begins when the PCs explore either area B18 or B19. Gragavan Kreeg is found "painting" in area B18, and fighting there will bring the three ogres from area B19 running. Likewise, if the ogres in B19 are confronted first, Gragavan hears the sounds of combat and drops his human paintbrush long enough to investigate. I suggest the following encounter for a party of five adventurers:

  • Gragavan Kreeg (Ogre Warhulk)
  • 3 Ogre Savages
Total: 2,250 xp (Level 9 Encounter)

B15 (Crypt)

Lorgus Fenker is no longer alone. Instead of being buried here last, he was interned in the crypt well in advance of the decision to stop burying the Black Arrow dead here. The leader of the patrol group that murdered him, however, was the last man to be buried here. Now, tormented by their proximity to each other, Lorgus, his commander, and the men who were part of the patrol that night have all risen from the dead and haunt the crypt.

This is a very difficult encounter, especially if tackled during the PCs' retaking of Fort Rannick. It is best avoided until after the conclusion of the events of The Hook Mountain Massacre. One of the events in the Keeping the Keep conversion will give the party cause to revisit the crypt.

The monsters in this encounter do their best to concentrate their ongoing, aura, and zone damage. The nighthaunt shrine (Lorgus) does its best to keep his zone of darkness on as many PCs as possible, and the oblivion wraith moves to catch the same group within its aura, using obliviate to increase the necrotic damage being dealt at the beginning of the hero's turn. I suggest the following encounter for a party of five adventurers:

Total: 4,200 xp (Level 13 Encounter)

There is nothing of value located here.

B11 & B16 (Entrance to Fort Rannick)

By the time the party reaches the keep, they probably no longer need to worry about attracting unwanted ogres from outside, even if they haven't killed all of them. It is unlikely that any ogres who aren't in the keep would notice sounds of struggle coming from inside.

The front entrance door can be thrown open with a DC 14 Strength check.

B10 (New Barracks)

Unless the party can find a way to light the barracks on fire, they will face a lot of ogres if they choose to explore the barracks. I suggest the following encounter for a party of five adventurers:

  • 6 Ogre Savages
  • 6 Ogre Skirmishers
Total: 4,200 xp (Level 13 Encounter)

The ogres each spend their first turn readying themselves for combat - whether that involves getting out of bed, drawing their weapons, or looking around for the intrusion is up to you.

As mentioned in the original adventure, lighting a fire underneath the barracks automatically kills all of the ogres inside. PCs should take care not to be caught within the burning barracks as well, since they probably won't be able to escape with the ogres scrambling for the exit. If the PCs kill the ogres by lighting the barracks on fire, award the party with the full amount of experience for the encounter.

B9 & B12 - B14 (Secret Tunnels)

Noticing the cave behind the waterfall is difficult (requiring a DC 25 Perception check). If the Black Arrows have spoken with the party about the secret tunnels or if one of the Black Arrows points out the cave's location to them it is quite easy to locate (no Perception check required). Climbing up into the cave is a DC 15 Athletics check. Within the cave itself, characters must balance in order to walk across the bare floor of the cave (DC 20 Acrobatics check).

Shocker lizards await within the hidden armory (here, bluespawn stormlizards and juvenile behir thunderlances). They attack out of surprise when they notice the party. I suggest the following encounter for a party of five adventurers:

Total: 2,200 xp (Level 9 Encounter)

In addition to the stock of mundane weaponry located in this cave, treasure parcel 1 from level 8 can be found in one of the crates.

The bridge over the ravine in area B14 still threatens to collapse. Its stat block can be found below. At the bottom of the ravine are a pouch containing seven large rubies worth 100 gold pieces each (treasure parcel 9 from level 9) and treasure parcel 3 from level 9.

Stat block:

B7 & B8 (South Gate)

This encounter can play out differently depending on whether the party happens upon the ogres guarding this gate during their approach to the fort from the outside, or while exploring the fort's grounds from the inside.

If the ogres spot the party coming up the road to Fort Rannick, they begin raining javelins and arrows down upon them if they feel they have a clear shot. If this looks like it isn't deterring the PCs, they raise the portcullis and charge out over the bridge.

If the PCs encounter them within the keep, they don't bother trying to pin them down at range, and simply rush into melee to take advantage of their superior strength.

I suggest the following encounter for a party of five adventurers:

Total: 2,550 xp (Level 10 Encounter)

The gate can be raised or lowered from the inside of the keep with little difficulty. Lifting it high enough that it can be walked under requires a DC 28 Strength check.

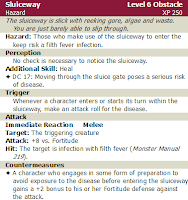
The sluice gate is its own obstacle, and a DC 20 Acrobatics check is required to slip through for medium creatures (followed by a DC 18 Strength check to dislodge the corpse at the end). See below for the sluiceway's stat block.

Stat blocks:

B6 (Cook House)

Jolly Kreeg has recruited a handful of otherwise unoccupied ogres to assist him in preparing Jaagrath's meal. They mill about inside the cook house, tending to the cooking fires, rolling dough, or flipping a Black Arrow corpse with an ogre hook to ensure even smoking. I suggest the following encounter for a party of five adventurers:

Total: 2,500 xp (Level 10 Encounter)

Jolly bosses his kitchen crew around even during combat, ordering them to engage the party in the same way a chef might order a line cook to prepare a particular dish. Though the smokers are currently operating, they burn at a low enough heat that brief contact with them isn't particularly harmful.

Stat block:

Saturday, April 18, 2009

B4 & B5 (Old Guard Tower)

The ogres stationed here don't pay the party much attention unless they are attacked or someone tries to climb up into the tower. The tower itself can be attacked and destroyed without much difficulty. See its stat block below for details. I suggest the following encounter for a party of five adventurers:

  • Karly-Lop Kreeg (Ogre Warhulk)
  • 2 Ogre Skirmishers
  • 1 Ogre Savage
  • Old Guard Tower
Total: 2,650 xp (Level 10 Encounter)

Karly-Lop Kreeg carries treasure parcel 1 from level 10. This is done to allow you to place a ring (an item type that doesn't really open up until the party receives level 14 items) in the treasure found here.

If the tower is collapsed, the ogres guarding the gate at area B8 come to investigate after one minute, and spend ten minutes examining the ruined guard tower before returning to their posts. They attack the PCs if they are spotted.

Stat block:

B2 (East Gate)

While only a single ogre skirmisher is stationed here permanently to keep an eye on the gate (and who has a passive Perception score of 12 because he is distracted), a few more ogres walk the courtyard, and are either in or heading to area B2 when the party arrives. I suggest the following encounter for a party of five adventurers:

  • 3 Ogre Savages
  • 3 Ogre Skirmishers
Total: 2,100 xp (Level 9 Encounter)

The ogres in area B4 are too distracted to be alerted to an attack in area B2. The rubble blocking the gate would take some time to clear and require a lot of heavy lifting. You should make it clear to the PCs that getting the gate open would leave them very exposed. If they persist, the ogres in area B4 eventually shrug off Karly-Lop and may notice the party.

The Black Arrows in Fort Rannick

Regardless of which way the party chooses to approach the infiltration of the keep, the remaining Black Arrows and Shalelu take a different route. Their goal is to end up at the front entrance to the keep itself, keeping a watch on the ogre activity on the outside while the PCs head inside to take on the ogre leadership. No matter which approach they use, the Black Arrows are skilled in the art of stealth and know the layout of the keep like no one else does. They do not attract attention to themselves, and arrive at the main entrance to the keep without incident. They wait for the party there, expecting them to make their presence known either once they reach the keep, or after they've dealt with the ogre threat within.

They will assist the party if a confrontation breaks out in the keep's courtyard after they've made it inside the fort's walls. If they participate in combat, add their numbers to the effective party size when calculating the amount of experience each party member receives.

Fort Rannick

When the party approaches the keep, inquire about how they plan on approaching it. As outlined in the original adventure, a number of options are apparent (or are described to them by the remaining Black Arrows).

A quick note on differences between editions: ogres in D&D 3.5 were given darkvision, and the ogres' ability to see in the dark is assumed in the original adventure (and is one of the obstacles the party has to incorporate into their plan). In order to stay faithful to the campaign setting and its flavor, all ogres in this conversion are given darkvision. This is, of course, not listed in stat blocks found in the Monster Manual and other monster sources. In practice, this will not significantly change the balance of power in the fight. The PCs have no good reason to attack at night when they would need light to see and the ogres wouldn't. Unless they have a trick up their sleeve, it's probably a smarter call to attack during the daytime when they can see as well as the ogres can.

As the PCs approach the fort, they may be spotted by the ogres standing watch. If they make no effort at hiding during their approach, the ogres see them coming easily. If the party makes Stealth checks, compare the results against the ogres' passive Perception scores of 14. Remember to add 2 to the DC of the Perception check if the party never approaches within 10 squares of the fort. If the ogres spot the PCs, the ogres at the appropriate gate run out to meet them.

If the party chooses to utilize the sluice gate, run their approach to the keep as normal, followed by their attempt to squeeze through the gate. This will be outlined in the write-up for B7. The Black Arrows will insist that they pursue the secret tunnels into the fort if the sluice gate is used by the PCs.

If the party chooses to take the secret tunnels, run their approach as normal. Start the PCs in area B12. The Black Arrows will offer to approach through the sluice gate if this is the route the party takes.

If the party attempts to scale the wall (with a DC 20 Athletics check), they will be spotted unless they hide successfully. Attempts to use Stealth while climbing the fortress wall suffer a -2 penalty. Begin their encounters in whichever area they wind up on the other side of the wall.

It is very unlikely that the entire party will be able to approach from above. If one of the PCs does have the ability to fly at this level (a Druid, for instance), they can scout the area with little to no difficulty. Describe what they see in each exterior location. This is a smart move, and will give the party an idea of what they're up against.

When it comes to the keep itself, increase the size of the keep's interior significantly. Ogres are large creatures, and the fact that most of the keep's rooms and hallways are only 10 feet wide means that fights will become bogged down in corridors if they aren't widened. Consider making the typical width of rooms and hallways in the keep 20 feet.

Tuesday, April 14, 2009

Last of the Black Arrows

Once Jakardros and the other remaining Black Arrows are back on their feet, it will be useful to have stat blocks handy for them. All three are presented below.

In creating these characters, I made use of the effects of a feat presented in the Art of the Kill article from Dragon #373: the Black Arrow Style technique feat. Whether by coincidence or homage to the Black Arrows themselves, this feat modifies ranger and rogue at-will attacks to improve their utility with Stealth. It was such an obvious fit that it would have been a shame not to use it.

It is unlikely that the party will initially find themselves fighting side-by-side the Black Arrows. When the party attempts to retake the fort, it is probably easiest to have one of the rangers suggest that they each take separate routes into Fort Rannick - and have Jakardros insist that Shalelu stay with him. The Black Arrows are best off providing support and distraction, and they know it. They can't handle sustained combat, so the PCs are sent in to take on those in charge of the ogre force at Rannick.

Stat blocks:


A17 (Prison)

Biggin, here, is replaced by two large monstrous spiders and a number of spider swarms to harass the party. While it's possible to dash in, open the cage, gather up the prisoners and drag them out without killing all the spiders, the party certainly won't have an easy time of it. I suggest the following encounter for a party of five adventurers (plus Shalelu):

  • 2 Blade Spiders
  • 4 Bloodweb Spider Swarms
Total: 2,200 xp (Level 9 Encounter)

All of the prisoners here are left at 0 hit points, are unconscious, and are out of healing surges.

A16 (Kennel)

The remaining Graul brothers are found here, lounging around their cobbled-together still. They attack belligerently when confronted, emboldened by their revolting moonshine. The still in the center of the room still contains some of the stuff, and any attack that deals more than ten points of fire damage to the still causes it to rupture and explode. I suggest the following encounter for a party of five adventurers (plus Shalelu):

Total: 2,488 xp (Level 10 Encounter)

If a fire does break out, the party has to think quickly. They don't have time to rest before the barn is engulfed in flames, and the next room contains a pack of monstrous spiders. If the barn burns to the ground, the Black Arrows will certainly perish.

If the party decides to put out the fire, you should improvise a short skill challenge to represent the attempt. If they fail, the flames continue to spread over the structure of the barn. A well stands just outside, so if they act swiftly they can use its water to combat the flames.

Stat blocks:


Saturday, April 11, 2009

Burnt Offerings Conversion PDF v0.2

I've updated the compiled conversion PDF to version 0.2. All the errors I was aware of have been corrected. Additionally, the background feats in the Player's Guide conversion are now character backgrounds, similar to those found in the Forgotten Realms Player's Guide and the Player's Handbook 2. Finally, index card-sized quest cards for all quests presented in the conversion have been added to the end of the document. Each quest card is its own page, and you should be able to print those pages directly onto index cards if your printer can handle index cards. As before, please let me know if you find any errors in the updated document.

Burnt Offerings & Player's Guide Conversion PDF

EDIT: This post is now out of date with the release of v0.3 of the Burnt Offerings Conversion.

Friday, April 10, 2009

A14 & A15 (Tendriculous Pit)

The Tendriculous doesn't have a 4th Edition incarnation just yet, and that's fine by me. What's essential to this encounter is Muck's sorry, fey-cursed state as a nearly mindless plant creature. The blightborn from P1 King of the Trollhaunt Warrens is an excellent substitute. I have modified the base creature and made it into a solo threat.

Solo monsters can run a pretty wide range of combat role. It's best to think of them as "solo" only in the sense that they should be able to occupy the attention of most or all of the party. They do not necessarily need to be the only monster in the encounter, and often shouldn't be. At the same time, however, some solo monsters can effectively account for an entire encounter relying on only their own abilities. A few of the dragons (not to mention Tiamat herself) are good examples of such beasties. This version of Muck Graul is an attempt at one such solo monster - as a controller, Muck is capable of locking down a large part of the party with powers that restrict movement while draining the PCs of their hit points. Muck's ability to create temporary minions grants it the extra damage boost it needs to pose a serious threat, and it has the same lockdown avoidance that two-headed trolls and other similar creatures do. I suggest the following encounter for a party of five adventurers (plus Shalelu):

Total: 3,000 xp (Level 10 Encounter)

Muck's tactics should consist of restraining as many PCs as possible at a time and pumping out minions with any remaining actions. With enough successful terrain control, Muck doesn't even need to approach the party in melee; as long as it keeps its minions and the party within its tangling roots, its actions are best spent restraining the party, extending its roots, and turning those roots into Tangling Root Crawlers. You may find that Muck's action points are best spent providing additional minor actions.

Area A15 contains a heap of treasure: the ring is worth 600 gold pieces, the necklace is worth 900 gold pieces, the sack of coins contains roughly 1,300 gold pieces, and the cloak clasp is worth 1,900 gold pieces (treasure parcels 5, 7, 8 and 9 from level 8). The party should also find treasure parcel 2 from level 8 and treasure parcel 4 from level 9 here, in addition to Jarkardros' distinctive elven longbow (here nonmagical).

Stat block:

A12 (Hucker's Lair)

Hucker now keeps a total of four donkey rats. When the encounter begins, place two of the rats in the room with Hucker. The remaining two should emerge from a nearby basement wall when there are signs that Hucker is in danger, moving to flank the PCs if possible. Note that the donkey rats are functionally identical to Rukus's hounds - this was done to make everyone's life easier, and chances are good that the players won't know the difference. I suggest the following encounter for a party of five adventurers (plus Shalelu):

Total: 2,200 xp (Level 8 Encounter)

You can cement the idea of Hucker as a caretaker for the rats by having him wail pathetically at their deaths, calling them by name.

Stat block:

A9 (Bedroom)

The chest here allows the party to play its own (perhaps unwitting) game of "beat the blade". This is an easily beaten trap, especially if the party comes up with an unconventional solution (one such solution is mentioned in the trap's stat block, but other possibilities exist - using mage hand to lift the sack out, for instance).

The sack of coins contains roughly 100 gold pieces worth of assorted currency (feel free to make the exact amount slightly more or slightly less). Area A10 contains four 6th-level flasks of Alchemist's Acid (see Adventurer's Vault). Both of these treasures combined count as treasure parcel 10 from level 9.

Stat block: